Welcome to the CarbonCycle Composting Guide – the ultimate guide on how to compost.
If you prefer to download and read it in your own time, a PDF version is available here.

Welcome to the CarbonCycle Composting Guide – the ultimate guide on how to compost.
If you prefer to download and read it in your own time, a PDF version is available here.
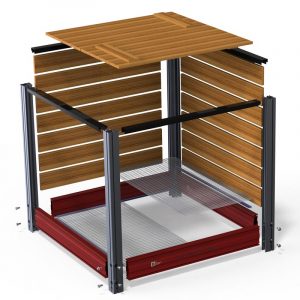
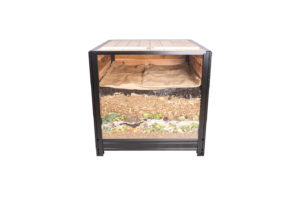
This guide is an essential part of the CarbonCycle Composting System alongside the CarbonCycle Composter Frame.
If you are reading this then you probably have at least one of our frames already. If so, congratulations. You have the best composter or composters possible and will get years of enjoyment from it or them. In fact, if you only have one or two we wouldn’t mind betting that you will be keen on another composter before too long.
If you do not have a CarbonCycle Composter Frame, then you will not benefit from the system as much as you might but, if you are keen to compost, then we are still keen to help. We know that the frames are not inexpensive, at least not initially, so we can understand why they may not be affordable to everyone. But we are sincere in our mission to save our soils, environment and society so we have made sure that 99% of what we say in this guide applies to all composters. So, don’t hold back on embracing what we have to say. Indeed, if you have any questions, we will do our best to answer them regardless of whether you have any of our frames.
The CarbonCycle Composting System is protected by international patents, trademarks and copyright laws.
In this section:
 This will depend on how much raw material you are likely to produce and how quickly you want to achieve a ready-to-use final product.
If you have a standard-sized section and intend to use the composter only for your own household, then we are pretty sure you can compost with a single bin. That might not be the case if you have a lot of trees and shrubs that you intend to prune, or in the off-seasons when lawn cuttings are substantial. But even then, you might be able to stockpile your material until the existing pile has fully decomposed or reduced enough to allow more to be added to it.
Otherwise, if you intend to compost using contributions from others or are likely to generate more material on-site than average, you may need more than one composter.
Equally, even if not needed, you may want more than one composter because it is more efficient to have two or more. Turning will be much easier, and because piles reduce by up to two thirds, your capacity will more than double.
Compost experts invariably commend a three-bin system, as do we. Basically, material progresses with each turn to the neighbouring composter. Maybe it can from time to time also be turned from composter 2 back into composter 1, or from composter 3 into composter 2 but final maturation (and final offtake into the garden) takes place in composter 3.
For most sites the location of the composter is obvious. Many properties will put them on a rear or side boundary. Many will also ensure that they are as close as possible to the main source of organic material or to the main beneficiary of the final compost product (maybe a vegetable garden).
The CarbonCycle Composter does not need to be placed on level ground. Its lower rail has been deliberately raised so that it will not be hit by uneven ground. Sometimes, one or two columns will need to be dug slightly into the ground or raised slightly above the ground. This is a very easy process.
If you have sloping land available, this could be ideal. CarbonCycle Composters have been installed on land as steep as 45°. The thinking then is that turning of the compost from the upper bin is an extremely simple matter of pulling it from that composter into the next composter below, and gravity does most of the work. If this appeals, it will be necessary to ensure that, while standing on or above the lower composter, you are safe. The rigidity of the CarbonCycle Composter will readily accommodate this.
Ideally, each composter should be located in a manner that permits access from all sides although access from two sides will be sufficient.
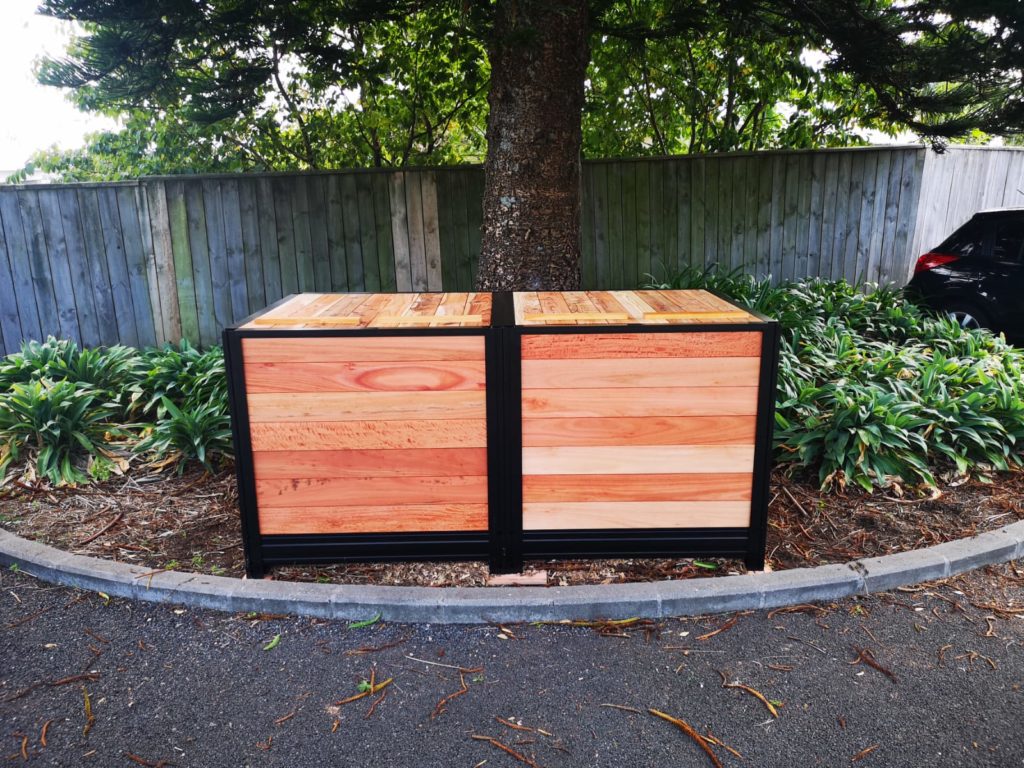
Where there are two composters, they are best placed side-by-side.
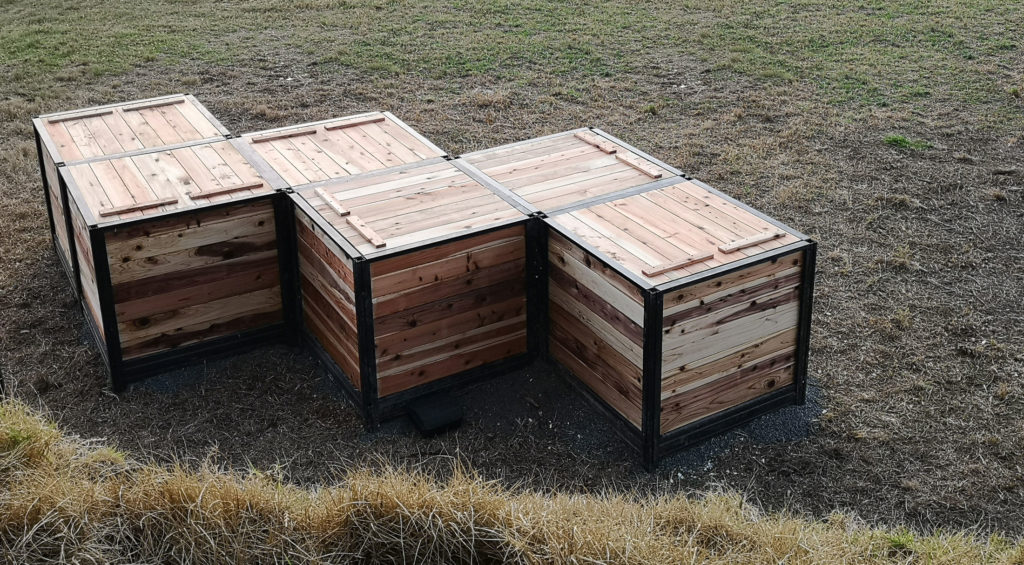
Where there are three or more composters, many options are available. For example, they may be side-by-side, in an L-shape formation or in a staggered pattern. Where space permits, we have found that a staggered pattern works wonderfully.
Exposure to sun and rain or modest wind is not really an issue, at least not for the functionality of the composter. However, you might prefer to have some shade from the elements when working on the composter so if there is some overhead cover, that should be considered. Winds can dry out the pile so if you can protect from them, great. But the CarbonCycle Composter provides all the protection the pile should need.
Access to a ready water source is also sometimes an advantage. Less so if you are composting a lot of food scraps as they are largely water anyhow.
Please also consider your neighbours. A well-kept compost should not be a nuisance at any time but often distance will be appreciated.
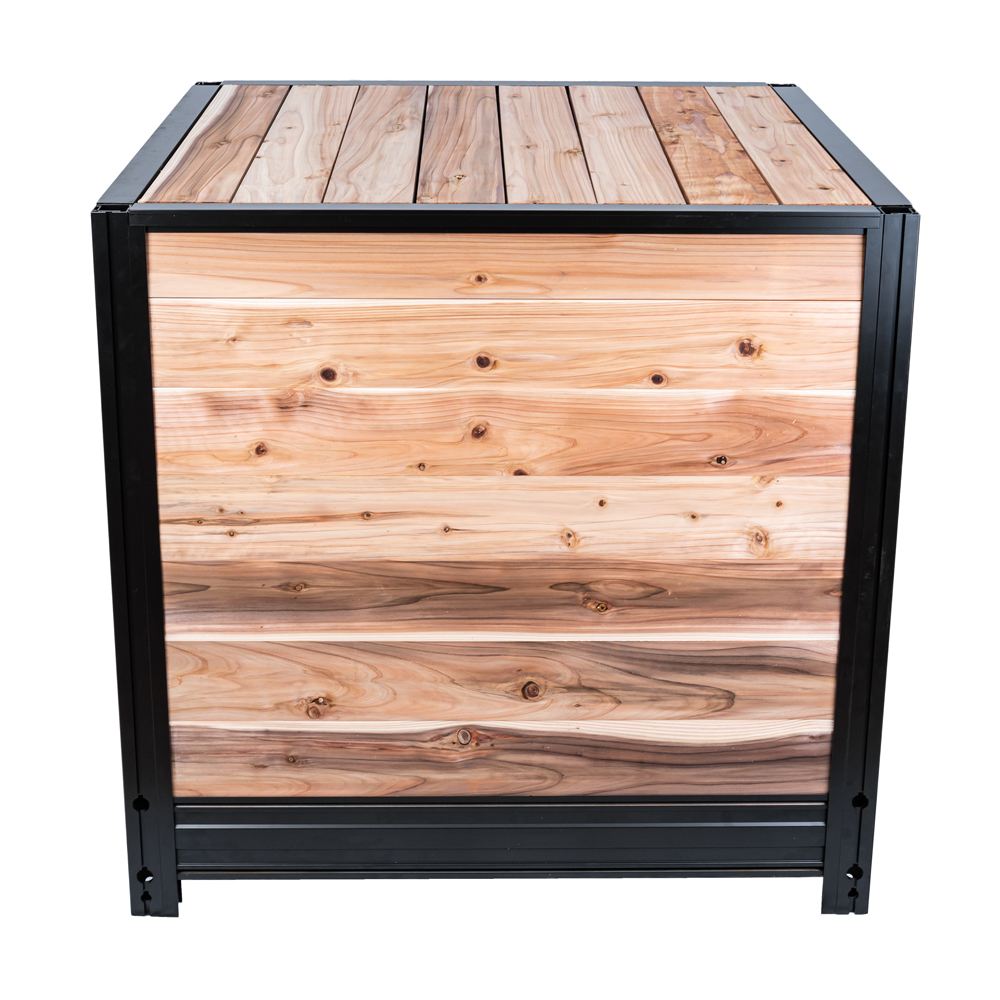
Assembly instructions are provided with parts supplied. To address gaps between slats: traditionally, composters have provided spaces between each slat. The thinking has been that those spaces assist with the aeration of the compost pile. In our opinion, that assistance is minimal at best and is outweighed by the fact that it makes a composter less attractive to the eye and more attractive to pests. The CarbonCycle Composter is designed so as not to have such gaps but users are welcome to include spacers between slats if they wish. It’s a personal choice.
The genius of the CarbonCycle Composting System is the CarbonCycle frame. You will be able to enjoy all of the benefits of the CarbonCycle composting system even if you only buy the frame. Having said that, we consider that the other parts that are available will make your task easier and, quite possibly, more successful.
The choice of slats is probably the most important decision that you will make. The CarbonCycle Company offers various choices.
It is intended also that composite (recycled plastic and/or timber) slats be offered as part of the CarbonCycle System.
For those who wish to have a designer effect, the dressed timbers will be capable of paint, stain, or oil finish. We doubt that you will wish to paint the interior surfaces but many such finishes are perfectly harmless these days.
As to both endurance and stability, the premium timber has substantially superior qualities as compared to the standard timber.
For completeness, the CarbonCycle Company also offers pest-proofing for the base of the composter and a lid option.
Other products are intended.
It will be important to decide what your goals are. Of course, these can change over time but they will influence the way in which you compost.
We all share the goal of avoiding burying organic matter in environmentally disastrous landfills. But beyond this, there are other goals.
If you were simply wishing to process your food scraps then your life will be extremely simple. You would simply fill your composter with carbon-rich material into which you would bury your food scraps on a regular basis. You will be astonished by the way in which, even after a few days, your food scraps will decompose so that you would not recognise them. In our experience, it takes months and months to exhaust the carbon content of the bin with a standard family‘s food scraps. As a minimum, you will get many, many money months of free and easy disposal. And at the end of that you will have a perfectly good compost that you or others can use.
If you are at the other extreme and intending to use your final compost material for food gardening, and to have lots of it, then your life will be slightly more active and fun-filled. You will be turning the compost more often and you will also need to be slightly more careful about your inputs in that you will not wish to put into your composter anything that might contain material unfit for human consumption.
There is another possible goal: to end up with the best soil compost can deliver. If this is the case, you will need to have a good understanding of your present soil condition and, in particular, its deficiencies. Soil varies immensely from country to country but it can also vary between neighbouring properties because of environmental factors or prior treatment. Often, deficiencies can be compensated by what we might call “ordinary compost” but sometimes additives might be required. Also, composting methodology can affect the quality of the final product (humus) and therefore the quality of the soil to which it is added. We referred to this in more detail when discussing basics.
The Essentials:
 One or more CarbonCycle Composter frames with the sides, lids and pest-proofing you decide
The Optional Equipment:

In this section:
The CarbonCycle Composter is designed for aerobic composting. There are other forms of composting including anaerobic composting, vermicomposting (worms), etc.
Aerobic composting involves the decomposition of organic matter using micro-organisms that require oxygen. That is the aerobic part. These microbes occur naturally in the air, on the surface of organic residues and in the ambient . The oxygen from the air diffuses into that organic mixture and is inhaled by the microbes. A successful aerobic compost system will require plenty of air. That is supplied automatically initially, in the spaces between the bits of material. As material decomposes the air is lost and it needs to be refreshed by turning the compost.

windrow compost
In anaerobic composting, in the absence of access to oxygen, most of the chemical energy in the organic material is released by anaerobic bacteria as methane gas. We struggle with anaerobic composting. It is really not much better than burying organic material in landfills, except that at least the final product can be put to good use. In the first two decades after its release, methane is 84 times more damaging to the environment than carbon dioxide.
Not all aerobic composting takes place within containers. For composting very substantial quantities of organic residues, windrows are often used. Whilst effective, a windrow is not as environmentally friendly or, for the quantities we will encounter locally, as efficient as a properly contained aerobic compost.
Whilst other forms, sizes and materials are used in commercially available composters, the CarbonCycle Composting System is based on the use of the CarbonCycle Composter Frame.
The CarbonCycle Composter is able to be used for anaerobic composting but we consider this sub-optimal.
You don’t need to understand this and we don’t pretend to; at least not fully. And a lot of what we say here has been extracted from web-based searches (such as Hill Laboratories).
In simplistic terms, as a minimum, the Carbon:Nitrogen ratio of your humus (determined from total carbon and total nitrogen) is pretty much the C:N ratio of the perfect soil. You can probably stop reading now.
There are too many other variables around soil condition for C:N to be considered in isolation but here are the C:N ratios of soil of various conditions.
| Level | C/N Ratio |
| Very Low | <8 |
| Low | 8-10 |
| Medium | 10-15 |
| High | 15-25 |
| Very High | >25 |
Organic carbon is the primary source of energy for soil microbes, but these microbes also require nitrogen to multiply and utilise the available energy. The microbes utilise this carbon via respiration. They consequently lose carbon dioxide from the soil but leave a nutrient infused carbon residue. As the active fraction of the organic matter is thus degraded, the C:N ratio drops until a steady state (the passive fraction) is finally attained.
Okay, this is too much. We won’t go on even if we could. But the point is that compost can restore carbon to the soil and improve soil quality.
What is soil quality? It is a combination of physical properties such as soil texture and structure, stable carbon compounds, chemical properties such as pH and mineral nutrient content, and biological properties including living biomass and mineralisable nitrogen. All of these properties are profoundly influenced by the soil’s organic matter. Total organic matter and C:N ratios are traditionally used as a guide to soil quality and the likely rate of organic matter mineralisation.
These are fairly imprecise indicators however, as small changes in the quantity and nature of the soil organic matter can substantially affect soil quality and fertility. For example, certain types of organic material are very resistant to decomposition, e.g. lignified material such as wood (C:N 100: 1) and leaf litter (C:N 40:1) . If these are present, then a high C:N ratio may be found, and thereby give a false impression of the soil organic matter activity”.
Together, these soil profiles provide a minimum dataset for estimating and monitoring soil quality and health.
The Organic Matter (OM) level in the soil is strongly correlated to the soil’s cation exchange capacity (CEC), and is a source of many plant nutrients, particularly nitrogen. It also plays a major role in determining soil physical characteristics; soils with medium to high levels would generally be expected to have good structure, moisture retention and water infiltration.
In a nutshell, your soil will love your compost and reward you many times over.
In this section:
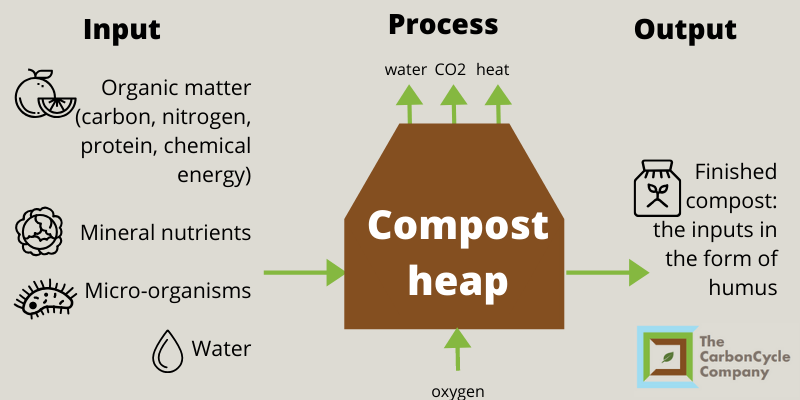
Let’s start with a diagram illustrating the composting process.
In this guide, we provide considerable detail about many of the finer points of compost making. For many of you, this finer detail is not required. Quite likely, the only sections that you will need to read are this and The Initial Mix – Balancing Your Compost and Turning Your Compost.
Aerobic composting is simply the way in which we can help nature do what it has always done and always wanted to do – to complete the carbon cycle. The only problem for nature has been that we have got in the way. We have lost the art.
So, aerobic composting is simply the best way in which to process (decompose) our organic waste, all of which came directly or indirectly from the soil, so as to obtain the resultant humic matter and to return it to our soil, so the cycle can continue.
Composting is a 100% natural biological and, strictly speaking, chemical process carried out by a vast variety and number (there are many billions in a handful), of micro-organisms. They literally eat the organic material and consume the oxygen in the pile in order to grow and reproduce. All we seek to do is to give them a little help.
These organisms produce carbon dioxide, water vapor and heat. As they do their job, the pile changes fundamentally from a varied mix into a homogeneous final product that is incapable of further decomposition. We call that humus or compost.
In making compost, we avoid putting our organic waste unnecessarily into environmentally disastrous landfills and, in using the final compost, we enable our soils to recover.
We simply need to provide the right mix of raw material, to turn it a few times to let the air back in and to wait.
So, what is that right mix? In simplistic terms, it is a matter of achieving a carbon: nitrogen (C:N) balance of 25-30:1.
Okay, there’s a bit more to it than this but it’s not as important to know.
Very few organic items already exist in the perfect C:N ratio so to achieve it, it is necessary to mix various materials together. This is not difficult. In fact, you would be reasonably assured of success if you simply made sure that around one half of your material was brown with the other half being green or food scraps. Again, this is rather simplistic but it will give you a general indication, and as with everything else in composting, there are no disasters. If something doesn’t quite work, the situation can always be rectified on the next turn of the compost.
So, you simply layer or mix your organic material so as to get as close as you can to the C:N balance of 25-30:1, and add water if needed to achieve damp but not soggy mix. There are some other additives (like lime) you might consider if you know that local soils are deficient. See What Possible Additives are There?
Then you take a break for a week or three (or more), unless you wish to add more material, which you can readily do by digging it into the interior furnace of the compost.
After that you will need to turn the compost a few times. We think at least three times and maybe more if you are adding more material.
Why do we turn the compost? We do so primarily to get air back into the mixture. It’s also an opportunity to break up any clumps of material that may have formed, and to add water/nitrogen materials if it has become dry or carbon materials if it has become sodden, anaerobic and/or odorous. There is no prescribed period after a compost is first set up or subsequently turned when it must be turned (again). However, as a rule of thumb, it would be extremely unlikely that a compost would need to be turned within its first week or two of life. If you need to achieve your final compost output in a hurry, then you will be turning more regularly, say, every 10-14 days. In you turn every 2 weeks, you might realistically expect to achieve complete your compost through to its final maturation phase within 8–10 weeks. At that point the temperature will be subsiding and the compost will benefit from being set aside under a tarpaulin or such to mature and hopefully to allow infiltration by worms and other soil-friendly beings. This is the maturing phase to which we refer below.
Either way if you are in no rush, then you may happily allow your compost to go cold and simply re-invigorate it by turning it when you so wish.
Depending on the nature of your compost material, you may well need to add additional water when you are turning your compost.
Again, this information is not necessary but composting literature breaks the decomposition process into two phases.
To achieve pasteurisation, the temperature of the whole compost mass must exceed 65°C (149°F), (most scientists say 50-55°C (122-131°F), but we play safe), for a minimum of three days. If you turn your bin so that material that was formerly on the colder extremities of the composter is mixed into the hotter core, this can be achieved in 3-5 turns.
At the end of the decomposition phase, compost enters its maturing phase. This phase is critical in producing a stable and fully composted end product. It is part of the decomposition process; not the end product stage.
During this phase microbial activity does not cease but it changes. Maturity is achieved when there is a return to near ambient temperatures. There will also be an absence of phototoxic compounds and a reduction of biological volatile solids but we don’t need to know that.
Maturing compost may still require some turning and watering to keep it aerobic and to sustain ongoing microbial activity.
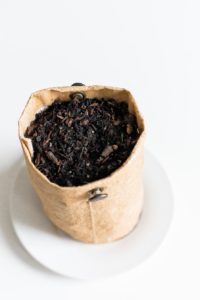
But after a month or three your “mature” compost decomposition will have finished and you will have your perfect humus. Yes, after all this fun and gentle exercise, you will have your black gold ready for application back on to your garden, lawn, pot-plants, etc. Just watch them grow! And taste the difference!
Before we leave this topic, we should say that we have tried to set out best-practice aerobic composting. But there are other systems that work and may often provide a better final product. One we have tried is set out in The Art of Composting by Kay Baxter. Kay practises what we might call slow-action composting. Her product might take 6 months to reach completion (humus). She does not use chip (shredded branches and the like) but she uses a much higher concentration of carbon than the standard 25-30:1. In fact she loves a 60:1 ratio. She is also an ardent supporter of adding layers of soil and what she considers to be essential minerals and nutrients like calcium carbonate, phosphate, iodine, biochar, garden lime (not dolomite), animal/poultry manure, seaweed, etc. And, finally, she does not turn her piles. She just takes great care in their establishment and leaves them alone apart from inspection and correction.
Kay’s practises are different to the CarbonCycle System. We consider that our gardeners will usually want a quicker potential turnaround, to be able to add to their pile and also to be able to use carbon in the form of chip. It just runs against the grain not to use such a valuable resource. But, if you are unlikely to wish to compost chip and you are in no great rush, the CarbonCycle Composter is ideally suited to Kay’s approach.
All organic matter can be composted. But some should not be.
Organic matter is matter that has come from a recently living organism. As such, it is inherently capable of decay or has resulted from decay or is itself composed of other organic compounds.
The organic matter in soil comes from plants and animals. When organic matter has broken down into a stable state, that is resistant to further decomposition, we call it humus.
Organic matter includes:
Lists of what you can compost are readily available on line but we think almost all lists understate what can be composted. The fact is that if it is organic it will compost, so you only need to worry about material that might attract pests, or contain pest weeds, pathogens or rhizomes. Here is a modified sample list of material you can compost.
Even though it is organic, generally, the composting of faeces is considered problematic and, in many instances, undesirable. This is especially so for meat-eating animals and for animals which have been subjected to any of a number of forms of human-intervention.
Many also suggest that meat, fish and other such products should not be composted. The main reason for this is that such products are more likely to attract pests but, in our experience, this risk can be overstated. A well-managed compost can easily process most such material. And, if the meat or fish was safe for human consumption originally it will be safe from any harmful content in your compost.
We have referred above to carbon and nitrogen. In general terms, nitrogen will decompose more readily than carbon. For this reason, it may be useful to shred the more difficult to decompose carbon materials such as dead leaves, tree branches etc to give the carbon a head start. Some prefer to use softer more readily decomposed carbon sources such as dried grass clippings, straw or hay, dried weeds, dried corn husks, bamboo litter etc that are small and/or soft enough to decompose in the intended timeframe. If needed, there are many low-cost commercial shredders that are extremely effective.
Fibrous material like palm fronds takes a very long time to decompose. Again, this material must be shredded (if that is possible), unless you are prepared to adopt a long-term view to your composting process.
Cardboard is an excellent source of carbon. It can be shredded or wetted and torn or simply placed intact into the compost mixture. It will decompose readily. It may also be laid flat on the top of a compost mixture so as to provide some thermal protection. Even then, it will readily decompose and can be included into the compost itself on a subsequent turn.
There is no problem with including weeds into your compost. If you are risk-averse, you will ensure that the weeds are not seeding but, even if seeds are included in your compost, those seeds will not survive if they are exposed to temperatures above 65°C (149°F) for a minimum of three days. As mentioned, most scientists say 50-55°C (122-131°F), but we play safe. For this reason, you may wish to ensure that weeds are placed in the centre of your compost when it is first established.
An alternative is to put any weeds into a black sealed heat-retentive bag, usually with some moist grass clippings, and to leave that bag in the sun for a period. It will quickly heat to a temperature that will kill all seeds. The contents can then be added to the pile.
Inorganic material will never decompose and therefore should not be put into a compost. This includes material such as aluminium, ferrous metal and other inorganics.
You will quickly start to hate plastic. Despite our best efforts to remove them, bits of plastic often turn up in our mix. Why does every bit of fruit we buy have to have a plastic label glued to it? And, what they say is true. Plastic will live forever and even when it degrades, it is still plastic.
And noxious material should also not be placed in your compost, especially if you intend to use your final product for growing food. This includes most treated timbers. Such treatments often include arsenic, copper and chrome, which are harmful but, in addition, the timber will not decompose.
Conservative composters also caution about using pet or other animal faeces of various kinds, meats and fish, whether cooked or uncooked. Various online sources will help you with making up your own mind as to whether or not you are prepared to compost all or any of these. But, under no circumstances should human faeces or the faeces of meat-eating pets be composted. Pathogen risk is simply too high.
Treated paper and coated cardboard are also best avoided.
And if you are composting cardboard from packaging, all plastic from labels, staples, and packaging tape will need to be removed.
You will also see many suggestions that you don’t compost fatty and oily foods. This is only because they can attract pests but we prefer to compost them than to bury them in landfill. Having said that, only a small proportion of any pile contains such material.
So, the list of organic material that cannot be composted under the CarbonCycle System is very short indeed. But, if you wish to be extremely cautious, at least to start, here is a modified list of what some say should not be composted.
The focus of the first mix is to achieve rapid, biological decomposition and stabilisation of the organic materials. This requires conditions that allow for the development of temperatures in the 65°-80°C (149°-176°F) range (referred to as thermophilic).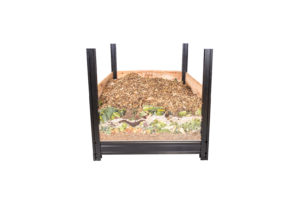
If this biologically produced heat can be achieved, the process will result in a final product that is sufficiently stable for storage and application to land with immensely positive environmental effects.
As we have mentioned a number of times, the ideal carbon: nitrogen (C:N) ratio is 25-30:1. If your ratio is within that range then your compost is balanced and will, almost definitely, decompose into perfect humic matter.
Here are some C:N ratios. No one needs to remember them.
In any event, we have seen other lists that suggest different ratios and any product will change its C:N ratio even if 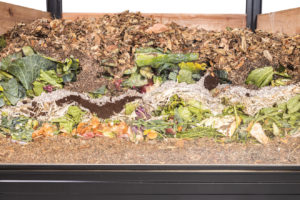 simply left alone. For example grass cuttings, if allowed to dry may become 50% more carbon rich. It is enough to get the feeling for the sorts of material that are carbon-rich and the sorts of material that are nitrogen rich. You will note that all relevant material has more carbon than nitrogen. The only question is how much more.
| Greens – Nitrogen-rich | C:N |
| Alfalfa | 12:1 |
| Clover | 23:1 |
| Coffee grounds | 20:1 |
| Food scraps – mixed | 20:1 |
| Food scraps – vegetables | 25:1 |
| Mixed garden cuttings (not all green) | 30:1 |
| Grass clippings – fresh | 15:1 – 20:1 |
| Grass clippings – sun dried | 20:1 – 25:1 |
| Hay from grass | 15:1 – 32:1 |
| Hay from legumes | 15:1 – 20:1 |
| Manure – cow | 20:1 |
| Manure – horse | 20:1 – 50:1 |
| Manure – poultry | 3:1 – 15:1 |
| Manure – others | 15:1 – 25:1 |
| Seaweed | 19:1 |
| Weeds | 30:1 |
| Browns – Carbon-rich | C:N |
| Ashes (wood) | 25:1 |
| Cardboard | 350:1 – 560:1 |
| Corn stalks | 75:1 |
| Fruit waste | 35:1 |
| Leaves – oak | 40:1 – 80:1 |
| Leaves – mixed | 60:1 |
| Newspaper | 175:1 |
| Peanut shells | 35:1 |
| Peatmoss | 50:1 |
| Pine needles | 80:1 |
| Sawdust | 325:1 |
| Straw | 75:1 |
| Wood chips | 400:1 |
And, because we know you were wondering, humans are 18% carbon and 2.5% nitrogen, so we have a C:N ratio of 7.2:1. Best to add a bit more carbon when we offer ourselves to nature.
In a perfect world it might be possible to weigh and measure each individual component that goes into the heap and, taking account of the assumed carbon/nitrogen of each component, calculate the average ratio of the heap. While it is good to know the C:N ratios of the material that you are adding, this is an entirely unnecessary exercise. It is better to know whether each ingredient is on the nitrogen side or the carbon side and have a general understanding the intensity or concentration in either case.
With that knowledge, build your heap and let the rapidity and intensity of heating be your guide as to what (if any) adjustments need to be made. In general the options are to add carbon materials if too hot and nitrogen if too cool.
Keep in mind that the heat generated in a compost heap (assuming it is moist and aerated) is a function of the volume of aerobic microorganisms feeding on the proteins and carbohydrates in the heap. The more micro-oganisms the, more feeding, the more breakdown of organic matter, the more respiration, the greater the release of heat into the heap.
Micro-organisms, like all other organic compounds have a specific carbon nitrogen ratio. Micro-organisms are high in nitrogen with a ratio of 2-7:1 Nitrogen is the critical component in the synthesis of protein from carbohydrate. In short, microbes are highly proteinaceous and for them to breed and reproduce rapidly they need a generous supply of nitrogen.
So a cool heap needs more heat, needs more respiring microbes, needs more nitrogen. On the other hand with an overly hot heap the addition of carbon will dilute the available nitrogen and the microbes will not breed as fast nor feed so voraciously. The heap will cool.
So, we need to try to achieve a final C:N ratio in the 25-30:1 range. Generally, we seek to achieve an average (actually a weighted average) close to this ratio in our initial combination of organic matter. This makes our lives simpler but, if we don’t have the feedstock, we can still start the process with what we have (hopefully not too much nitrogen), and re-balance later.
In fact, even if we start with a perfect 25:1C:N ratio, that will change as our micro-organisms work their magic. A lot of carbon will be converted to carbon dioxide and will leave the pile and other changes also take place but generally the C:N ratio of an initial mix will only tend to become more nitrogen-rich and less carbon-rich. So, with this in mind, we try to over carbonise our initial pile.
You won’t go far wrong if you simply ensure your pile is 1/3rd green/food scraps and 2/3rds brown. Some would suggest a ratio closer to 50/50 but it never hurts to have too much carbon. With more carbon, there will be no smell and, at worst, the process will take a little longer as all nitrogen is “consumed”.
Be careful not to allow lawn clippings to become saturated clods. They will stink and take time to compost. Freshly mown lawn clippings can be immediately composted and, ideally, they can be mixed with a carbon source as they are included in the pile. If they are left to one side until later, they must be kept dry. If they do clod, you will need to break them up before adding them to the pile. Not a pleasant task.
Please remember also that lawn clippings that contain long-lasting herbicides need to be excluded or carefully managed so that no compost is used to grow food until all risk of human harm is passed. We are not aware of herbicides that would take more than 1 year to decompose and many take much less time. But, why use these herbicides on your property in the first place? There are plenty of other options both organic and labour intensive (pull the weeds out).
Another consideration relates to “surface area”. This is just a clever way to say that all material (but especially carbon) should be as small as possible. This is because the micro-organisms work on the surface of the material and, the more surface there is, the quicker they will get to work and complete the job.
When you have decided what is to go into your initial pile you have 2 choices.
We have discussed lawn cuttings but the same concern arises with other nitrogen-rich material. You should avoid compacting large quantities of any green materials together, since they can rapidly become anaerobic, starving the microbes of the oxygen they need to thrive and to decompose your compost materials.
Managing the heat (through managing relative nitrogen levels) also achieves the important object of balancing of microbial feeding and respiration (i.e: release of CO2 into the atmosphere).
We turn our compost piles so as to get the air and, if required, moisture back in and to move material between zones that are inherently going to have temperature variations. But, at the same time, turning allows us to inspect and to correct.
A word about temperature zones. They are infinite in fact but it helps to consider three zones.
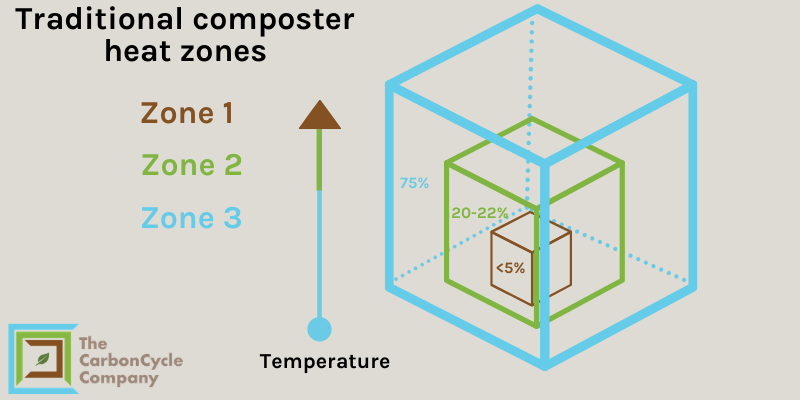
Zone 1: This zone gets the hottest. It is where pathogens and seeds can easily be destroyed. For many piles, Zone 1 is a reasonably small cube-like zone (about one third the width and one third the height of the composter pile), in the inner middle bottom of the pile. If your math is any good you will appreciate that a zone of that size is a very, very small part of a complete pile (under 5%). After testing, we are confident that Zone 1 under the CarbonCycle System is considerably larger. We intend to publish further data but we believe at least 50% of a pile will reach Zone 1 temperatures.
Zone 2: The next hottest zone. This is the zone of the pile that is immediately adjacent to Zone 1 but, being closer to the sides and the top, is slightly cooler. Again, in many composters, it is often extremely small but we believe that under the CarbonCycle System it embraces all of a pile other than the exterior 100-150 mm (4-6”) and possibly less than that at the top of a pile because heat rises. This zone is not as hot as Zone 1 but it is hotter than Zone 3.
Zone 3: The outer zone is everything that is left. It reaches the sides and the top of the pile. Material in this zone will not get as hot as in the other sections. It will therefore be likely to attract and house the most worms.
So, turning involves moving material from one zone to another and ensuring that after the final turn, all material has had a period in or close to Zone 1.
This sounds scientific. It isn’t. Especially under the CarbonCycle Composting System and super-especially when you have two or more bins. We have had no difficulty in achieving pasteurising temperatures in Zone 2 and even in much of Zone 3.
If you only have one composter, you will need to remove all material from your composter. You might wish to set up a ground-level working surface. For example, you could use a large piece of plywood or other hard material. It will probably need to be at least 1.5mX1.5m (5”X5”) to contain spills. We do not think soft surfaces are practical. Our forks kept damaging them and using a spade to scoop up final quantities is difficult. But it is possible to turn on the surrounding ground with no ground cover, so this is your choice.
When you remove material, it is very obvious which material comes from which zone and you can collect all such material in the same holding position. You can obviously see it as it comes out of a zone but the condition of the material is a dead giveaway as well. So, all you need to do then is to return material from one zone to another as best you can. If you intend only two or three turns in total you will need to be a bit careful about doing this. If you intend many more turns, we think you can almost play the odds i.e. over time every bit of material will have its time in or close enough to Zone 1.
And, if you have two or more bins, material in Zone 3 will automatically be pushed or pulled to the bottom of the composter. With a bit of practice, you will also be able to ensure that Zone 2 material (which you will turn next), finds its way into another zone.
The answer under the CarbonCycle Composting System is “all three work”.
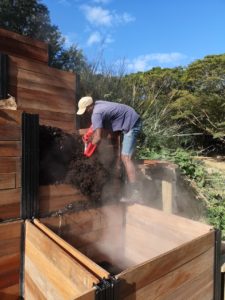
For a single CarbonCycle Composter, we find it easiest to pull the material from the composter using a standard garden rake. To do this you remove a slat or two from the top and pull the material across the remaining slats onto the ground, starting with ground as far away as possible from the composter so later removal is easier. You then repeat that, removing another slat or two and so on. Because material shrinks a little in size on removal, you will be able to do this to at least 1/3rd of your pile. Usually much more. In fact, it should be possible to remove material in this manner until you reach the bottom rail of the composter. Even then you can keep dragging for a while. The material at the very bottom of the composter is then forked out onto the ground.
When you have two or more composters, the procedure is the same except that you are pulling material towards you between the composters, i.e. it is dragged and forked from one composter to the next. And, of course, when you finish that transfer, you have finished the job. There is nothing on the ground to return. It’s already where it should be. That’s one of the greatest advantages of the CarbonCycle System.
For the single composter system, you will need to return material to the composter.
 As you go, you can inspect decomposition to date. Sometimes material might need to be broken up; clumps of formerly wet grass in particular. You will also get to love the worm-filled clumps but even they should be broken up. The worms won’t complain.
If the material is not sponge-wrung moist, you might also need to add more water. It’s just a great time to recalibrate and to refine the mix.
You can always add more material, either to re-balance the pile or because you have more to process. Of course, your compost will not be fully ready as humus until the most recently added material has been in the system for the necessary period.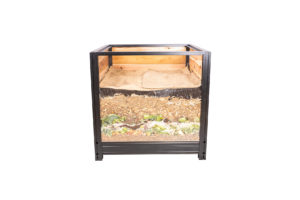
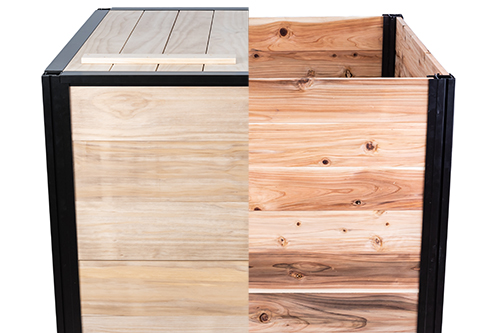
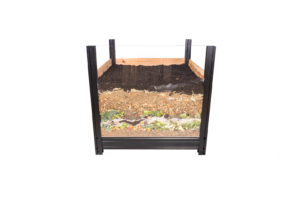
And, once you have completed your turn you will need to cap your material.
But there are plenty of other capping arrangements. For example, if it is not going to rain much, a rain cover is not really needed.
We supply a CarbonCycle Composter Lid. It looks and works great, and we love it but it is not a necessity.
Food scraps can always go straight into your compost pile. However, this is a bit time-consuming and also not very compost-efficient in that it should be mixed into your pile. If you have a lid or are relaxed about food scraps being visible and available, you might just put your scraps on the top of the pile and mix it in when appropriate, say weekly.
We recommend having one or maybe two holding bins. For many people a smallish 5-10 litre container under-bench is all you need to handle many days of food scrap. In turn, that might be transferred into a larger holding bin outside, which, when full, can be mixed into the compost pile. Such bins should have tights lids and the internal bin can usefully have a charcoal filter to remove odour.
Food scraps generally do not need to be broken down before composting. They decompose almost immediately. But if you are in a rush, you can help the process a little by cutting up harder and more fibrous foods like avocado seeds, pumpkins and banana skins.
Paper and cardboard boxes and packaging that cannot be re-used can be flattened. They can also sit on top of the compost pile awaiting the next turn.
Garden trimmings can be collected near to the bin. If you are nitrogen light then you may wish to get damp but not sodden green cuttings into the compost mix asap. If not, it can sit somewhere dry and commence its carbonisation.
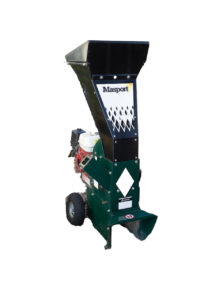
A shredder can be helpful for smaller branches and other items. They will break down even if not shredded but that will take much longer than other material in your pile. The shredder should be capable of reducing branches and twigs to a sufficiently small size, ideally finger-nail size or less. This will increase the available carbon to which the nitrogen can bond.
In our experience, some of the better shredders are less expensive than others. And if you have fibrous material like fronds you should consider buying a shredder with flail blades as well as chipper blades.
Under most conditions, a well-tended compost pile will be substantially decomposed (i.e. almost humic) within 8-10 weeks. It will then need a period of 4-8 weeks in which to fully mature into 100% humic material. It is possible to spread composting material before it is fully decomposed but that is not ideal for your soil or the environment. For example, as the material continues to decompose on or in the soil it will extract carbon into the atmosphere.
You will know when a pile is fully ready by its feel, colour and smell. It will feel soil-like and friable. It will be a rich black or very dark brown colour and it will smell sweet. You might also test its state by giving it one more turn. If it is ready, it will not heat up.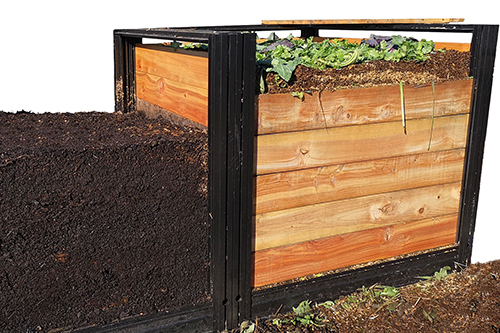
Many noble people make compost even though they have little or no need for the final product. We love them. But generally, there are pot plants, crops, or lawns that can benefit from your efforts. Or neighbours.
Leaving to one side the immense environmental advantages of composting in the first place, compost itself offers so much to our soils.
Compost is also an excellent soil amendment.
But often amendment is not required – just topdressing for general nutritional health of the soil, or mulch anywhere where things are growing.
In summary, compost enriches the soil.
Whilst some gardeners like to dig their compost into the food garden soil, that is really only necessary when you are seeking dramatic amendment of your soil condition. Otherwise, we recommend that, whenever possible, it is simply placed on top in layers from 15-45 mm (1/2”-1.5”). Much less is required on lawns and other non-food gardens (see below). Just as tilling of soil releases precious carbon into the atmosphere and is no longer commended, so too does digging into it to mix in new material. Humus left on top will quickly integrate into what is below.
If you need to mix compost into your soil, the general rule is that it should be mixed down to a depth that is three times the depth of compost being mixed. So, if you are mixing in 3cm of compost it needs to be mixed from the near-surface down to approx. 9 cm underground. So, the mix is approx. 1-part compost to 2-parts soil.
For lawns, gardens and shrubs where you are seeking to spread your final product as a top-dressing and not amend the soil materially, the best time to do this is after thatching or core aeration if applicable. Around 3-6 mm (1/8”-1/4 “) is all you need. It disappears in no time.
In all cases, it is also preferable to apply the compost when rain is likely or irrigation is available.
Although there are major nutrients in compost, the quantities are not huge. So, if you are using compost as your major or sole source of nutrients for your plants (as you should), you will need to use more compost. But fertility increases with each addition of compost and over a period you will be able to reduce the quantity spread.
Compost can be used as a potting mix component but not as a complete mix. It can be used for up to a third of the total mix. The rest should be peat moss, sand, perlite, vermiculture or bark.
compost tea
You can also make compost tea, which is a result of mixing compost with water, generally by soaking the compost in a burlap bag for a few days. We have seldom needed or wanted to do this but you can check online if you think this is for you.
Sometimes, larger items survive the composting process. There is nothing inherently wrong with leaving them in the mix to be distributed but if you wish, they can be extracted by sifting/sieving. There are many products available to achieve this or you can readily make you own with a squared wooden rectangle and some wire mesh. There are various gap sizes for your mesh and you can choose a size that suits. Chicken wire does a pretty good job but still lets some larger pieces through.
Sifted material can be used in the next compost (with or without being shredded or otherwise broken up).
Suggestion: separate out an area on which you do not put your finished compost. In all other respects plant that area in the same manner as you plant the other areas and see what happens. In our experience, you can expect at least double the output and taste in the areas to which your finished compost has been added.
In this section:
Additives seek to speed up the composting process or to add some extra nutritional value to your mix, usually to make up for local soil deficiencies.
We have never bothered with accelerating additives. On the whole we think they are often sold in combination with compromised composters to compensate for their inadequacies. The CarbonCycle Composting system certainly works fine without them. But we don’t knock them and they do add another dimension to the mix. So, feel free to see what is available but make sure it is entirely organic. If you are in a rush, they will do no harm
As to adding extra nutritional value, you should always seek to understand the deficiencies in your soil conditions. It is best to test your soil but you will probably not go wrong if you simply inquire about regional soil conditions in your area. Of course, you might also need to know whether your soil is “original” or “imported” onto site.
Compost piles will decompose at low ambient temperatures. However, in general, the outside temperature needs to be above 7°C (45°F) for a medium-sized compost heap without insulation to work.
But you may still add your scraps at lower temperatures. They will happily sit until things warm up.
There is no ambient temperature at which composting will not work. Indeed, although the microorganisms do the real work and create their own heat, we have had some extremely speedy compost results in the tropics.
If you wear appropriate gloves and footwear (and eye protectors and ear muffs if shredding), there are very few other safety considerations.
Many pathogens and herbicides will disappear in the composting process. But some herbicides persist in the soil for 1-12 months. Lawn cuttings and the like will consume these herbicides and it is best to assume that they remain in the mix. Times vary depending on quantities, weather, soil conditions and the like but there are norms. Here are some.
| COMMON NAME | TRADE NAME | PERSISTENCE IN SOIL |
| Glyphosate | Roundup; Kleenup | 1 month or less |
| Benefin | Balan; Balfin | 4-8 months |
| Bensulide | Betasan; Prefar | 6-12 months |
| DCPA | Dacthal | 4-8 months |
| 2, 4-D | Various | 1-2 months |
| Dicamba | Banvel | 3-12 months |
| Clopyralid | Versatill; Archer | Banned for use on lawns in USA and many other countries |
| MCPP | Various | 1-2 months |
We try to avoid putting any herbicide-containing cuttings into our piles. Indeed, we try to avoid (and do avoid) using the herbicides in the first place. Weeds tend to grow in poor soil, so compost-treated soil quickly loses its attraction to weeds.
And if your compost may contain any noxious material upon completion, it should not be used to grow food. There are plenty of other uses for it on your lawns, around your trees and shrubs, etc.
You will know when your pile is hot simply by digging into it and looking. Usually the steam alone will tell you.
But it is helpful and reassuring to know that your pile Zone 1 at least (but, in our experience Zone 2 as well plus a fair part of Zone 3), has achieved 65°C (149°F) for at least 3 days so that you can be confident pathogens and seeds are being destroyed. It is also fun to compare various pile mixes.
There are many inexpensive thermometers available. They should, ideally, have a long reach of 38 cm (15”) or so.
If you know that all material in your pile is organic and pure and are not seeking to remedy any major deficiencies in your soil, then testing is not necessary. If you have any doubts then you may care to have it sample tested, especially if you want to use your compost to grow food.
There are many testing agencies. If need be, you might need to package your sample for transportation. But the peace of mind justifies the effort and you should not need to repeat it unless other types of material are added to later mixes.
Here are some common issues that you might encounter with your compost pile, and how they can be remedied.
| SYMPTOM | PROBLEM | SOLUTION |
| Parts of my pile are dry | Not enough water | Turn the pile and add water. |
| My pile is damp and warm in the middle, but nowhere else | The pile is too small | Buy a bigger composter if need be or just add more organic material. |
| My pile is damp and smells sweet but is not getting hot | Not enough nitrogen | Mix in more nitrogen-rich material (fresh grass clippings, food waste, etc). |
| The grass clippings in my pile are clumping | Clippings too wet and insufficient carbon | Avoid putting sodden clippings in the pile. Break them up when adding them to the pile. And ensure they are mixed with carbon-rich material. |
| My pile is attracting flies | The pile is emitting attractive odours or offers easy food | Never let your food scraps be blown (eggs laid). Keep them covered or buried in your pile. Keep your composter clean on the outside. Keep your lid tight. Ensure that all exterior parts of the compost pile are carbon-rich or humic. Plant fly-repelling plants (generally aromatics), nearby. Basil, tansy, mint, sweet woodruff, marigold, lavender, rosemary, and citronella are all easy-to-grow outdoor plants. |
| My pile is leaching liquid from the bottom | Excessive fluid – generally resulting from a high food-scrap content in a pile | Add more carbon to the base of the pile. If your mixtures are highly based on food scraps you might wish to consider a base tray. We have developed and used such trays and will be delighted to share what we have learned with you. |
| My pile is attracting pests | The pile is attractive to pests because it is a food source or warm. It is also accessible to pests | Pests include rodents and snakes. (We do not consider most other bugs and insects to be pests. They are helping with the processes.)
The CarbonCycle Composter is substantially pest-proof on the sides and lid. It is not pest-proof at the base because the base rail is raised to accommodate uneven surfaces. Add more non-attractive carbon-rich material at the bottom or any other points of entry. If pests persist, then a base pest-proofing kit is available . A clean exterior is not only a good look. It also reduces pest concerns. Ensure meat, fish and other pest-attractive material is buried deep in the pile. Or stop composting them for a while. Have pest-baits and traps nearby. |
| My compost is taking forever | This can only be because you have not got the right C:N and moisture balance in your pile or because you have not turned the pile | Turn the pile and correct the C:N ratio |
| My compost is too hot
Too hot means over 60°C (140°F). But, actually, we think 70°C (158°F) is no cause for alarm. |
This can only be because you have not got the right C:N and moisture balance in your pile | Turn the pile and correct the C:N ratio |
| My compost is not getting hot | This can only be because you have not got the right C:N and moisture balance in your pile or because you have not turned the pile | Turn the pile and correct the C:N ratio |
| I don’t know where to get carbon-rich material | You should not struggle to locate carbon-rich material. Start first in your own gardens. Much green material can be left to carbonise. This includes dried lawn cuttings but they will need to be spread so that they do not clump. Twigs and branches can be shredded. Cardboard can also be used.
Beyond that there is always a limitless supply of sawdust, shredded trees and the like within easy reach or a phone call. Many tree-felling operations are delighted to be relieved of their loads. Hay helps make a great compost. |
|
| I don’t know where to get nitrogen-rich material | Start with food scraps and wet green garden trimmings. If you need more, your neighbours will be delighted to contribute. Other sources include coffee husks from roasters, coffee beans and grinds from cafes. And, when you are still short of nitrogen you could simply relax and wait until the seasons change. A pile with too much carbon will still decompose available nitrogen and then become dormant until it is re-fed . |
|
| I still have twigs and large chips in my finished pile | Carbon-rich material is too large | Often you can simply leave this in the finished product and distribute it. But if you don’t want to do that, you can sift/sieve them out and use them in the next pile (with or without shredding). If you want to stop this happening then you can either change your carbon-rich material or shred your material more finely |
| I’m not getting any worms | Worms cannot access the pile or don’t like what the pile has to offer. | Worms are a composter’s best friend and they seem to come from nowhere in no time at all. They come from the soil below and sometimes they or their eggs are attached to the garden trimmings in the pile. But not all composts will attract worms. If your pile doesn’t then don’t worry. Your final product will still be fabulous and the worms will enjoy it when you distribute it. You can also always add worms. There’s no question that they breed in the mix. If your compost has a lot of compostable PLA then you will attract fewer worms. It is great to be able to compost these materials but they seem to be reasonably inert and non-nutritional in the system. So too, if your pile is disproportionately carbon-rich or maybe if your nitrogen is food-based, you can expect fewer worms. One of the great myths is that lemons and other citruses cannot be composted and that worms hate them. |

Albrecht on Soil Balancing – The Albrecht Papers vol VII, William A Albrecht, 2011
Composting and Compost Materials Booklet, Ecology Action (hard to find)
Composting at Home, Robert Rynk and Michael Colt, University of Idaho College of Agriculture, 1997
Hands-on Agronomy – Understanding Soil fertility & Fertilizer Use, Neal Kinsey & Charles Walters (3rd ed, 2013)
Principles and Practice of Soil Science – The Soil as a Natural Resource, Robert E White (4th ed, 2006)
Secrets of the Soil – New Solutions for Restoring Our Planet, Peter Tompkins & Christopher Bird, Third Earthpulse Printing, 2002
Teaming with Microbes – The Organic Gardener’s Guide to the Soil Food Web, Revised edition, 2010
The Art of Composting, Koanga Booklet, Kay Baxter
The Rodale Book of Composting, D Martin and G Gershunny (editors), Rodale Press, Book Reader Service
The Soil Will Save Us – How Scientists, farmers, and Foodies are Healing the Soil to Save the Panet, Kristin Ohlson, 2014
We hope you have learned something valuable from this Guide on how to compost. Leave a comment and let us know what you agree and disagree with, and what you think we should include in the next edition of the Guide!
Remember, you can also download the PDF version to refer to at any time.
Don’t forget to sign up to be a part of our CarbonCyclists Community for more meaningful discussions with other people who are passionate about composting.
Tony Winter
October 23, 2020 at 7:58 amWell what a complete guide that I am very interested to continue reading & digesting (pardon the pun) as there is way to much to take in at the first read through. I have composted for decades using a combination of plastic bins & timber bins around your bin size with generally good results. But the science & in-depth info you have produced has rely topped the info & process off so well way above anything I have read or learned over 50+ years. So I will now go back & read in more depth under a staged process as I don’t have the time to absorb heaps of info that you have gathered & presented to us all.
Well done & I will feed back to my garden, people at the Thames Market & the Moana School as they continue to make their compost.
I will also feed back to the T3 Food Waste Group as I believe that your system & units will be a good start to get actual food waste diversion under way in our area.